Sunday, June 17, 2012

My presentation at "U-TECH: Technology Ideas and Possibilities for Empowering 21st Century Youth"

Here is a link to my presentation at "U-TECH: Technology Ideas and Possibilities for Empowering 21st Century Youth", an IT seminar held on June 16, 2012 at Muhammad Ali Jinnah University (MAJU) in Karachi, Pakistan, which aimed to empower 21st century youth through technology:


Your feedback would be highly appreciated. Thanks!

Saturday, March 3, 2012

Converting YouTube Videos for Nook Color

This tutorial will show you how to download YouTube videos* onto your computer and then convert the videos to make them playable on a Nook Color e-reader.

* While most YouTube videos can be downloaded and converted for Nook Color playback, some YouTube videos have special restrictions on them, which prevent them from being downloaded onto computers.

Requirements:

  1. A Web browser with access to www.youtube.com and www.keepvid.com
  2. Java (Download from http://java.com/download/)
  3. HandBrake (Download from http://handbrake.fr/)

Instructions:

  1. Go to www.youtube.com and search for your desired video clip. For this tutorial, we will be using http://www.youtube.com/watch?v=PrRWkMoFNRc (How to Take Blood Pressure).
  2. Copy the URL of the video clip by clicking into the address bar of your browser, selecting the entire URL, and then pressing Ctrl+C on your keyboard to copy the selected text.
  3. Go to www.keepvid.com, and paste the URL into the textbox at the top of the page.

    3
  4. Press the “DOWNLOAD” button next to the textbox. If you are presented with any security warnings, you can accept them.
  5. Click on the “Download FLV” link. It doesn’t matter whether you select the 240p or 360p or any other quality.

    5
  6. You will then be prompted with a Download dialog box, so save the file to convenient location on your computer.
  7. Once the download completes, open HandBrake.
  8. In HandBrake, click on the “Source” button, then “Video File”, then find the video clip in FLV format that you downloaded, and then press “Open”.

    8
  9. Click on the “Classic” preset under the “Legacy” heading.

    9
  10. Under the “Destination” heading, browse to the location where you would like to save your file, then press the “Save” button.

    10a
    10b
  11. Make sure that the video’s width is less than or equal to 854, and the videos height is less than or equal to 480. Adjust as necessary. Videos with dimensions greater than 854x480 pixels are not supported in the Nook Color.

    11
  12. Press the “Start” button to start the conversion process.

    12
  13. When the conversion is done, a message will be displayed at the bottom.

    13
  14. The video has now been saved to the location you specified, and can now be transferred over to your Nook Color via the Nook Color’s data cable.

Sunday, August 21, 2011

Turn your Nook Color into a full-blown Android tablet

The Nook Color’s hardware is too good to be tamed by Barnes and Noble; it can do a look more than display e-books.

In this post, I will show you how to turn your Nook Color into a full-blown Android tablet. Following these instructions will not hurt your Nook Color because we will be running Android from a microSD card. If you want to use your Nook Color’s default operating system, just take out the microSD card and reboot your Nook Color.

This post is based on instructions available at http://forum.xda-developers.com/showthread.php?t=1000957, which aren’t that easy to follow. So, this is my attempt at a better, step-by-step guide.

What you’ll need:

Hardware:

  1. Desktop or laptop computer with a USB port (I used a laptop running Windows 7, but it should work on earlier versions of Windows as well)
  2. Nook Color and its data cable
  3. microSD card of 1GB or higher

Software:

  1. 7-Zip (http://downloads.sourceforge.net/sevenzip/7z920.exe or go to http://www.7-zip.org/ and get the latest version)
  2. Image Writer for Windows (http://launchpad.net/win32-image-writer/trunk/0.3/+download/win32diskimager-RELEASE-0.3-r27-binary.zip)
  3. Size-agnostic SD Card CyanogenMod 7 installer (http://crimea.edu/~green/nook/generic-sdcard-v1.3.img.gz)
  4. CyanogenMod – a free, community built distribution of Android 2.3 (http://download.cyanogenmod.com/get/update-cm-7.0.3-encore-signed.zip)
  5. Gapps – Google Apps (http://cmw.22aaf3.com/gapps/gapps-gb-20110613-signed.zip)

Instructions:

  1. Install 7-Zip
  2. Right-click on Image Write for Windows (win32diskimager-RELEASE-0.3-r27-binary.zip) and, using 7-Zip, extract it to a folder on your computer’s desktop
  3. Right-click on Size-agnostic SD Card CyanogenMod 7 installer (generic-sdcard-v1.3.img.gz), and, using 7-Zip, extract it to your computer’s desktop
  4. Turn on your Nook Color and put your microSD card in it, then connect the Nook Color to your computer via the Nook Color’s data cable
  5. Open up My Computer and make sure you are seeing two additional entries (one for the Nook Color and one for the microSD inside the Nook Color)

    image
  6. Make a mental note of the drive letter assigned to the microSD inside the Nook Color (in my case, it is I:)
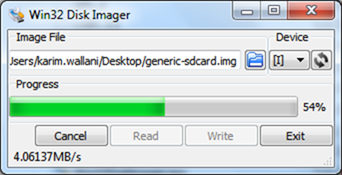
  7. Open Image Writer for Windows which you extracted to a folder on your desktop, click the folder icon and find Size-agnostic SD Card CyanogenMod 7 installer (generic-sdcard.img), select the the drive letter assigned to the microSD card (e.g. I:) and write it to the microSD card.

    image
  8. Close Image Writer for Windows
  9. Using Windows Explorer, copy CyanogenMod (update-cm-7.0.3-encore-signed.zip) and Gapps (gapps-gb-20110613-signed.zip) over to the drive where your microSD card is without renaming either of the two files

    image
  10. “Safely remove” your Nook Color from your computer, then unplug it
  11. Power off your Nook Color by pressing the Power button (located on the top left of your device) and Nook logo (shaped like an upside-down U) for a few seconds
  12. Restart your Nook Color
  13. If you did everything correctly, the Nook Color will boot from the microSD card, install CyanogenMod and Gapps (showing you a bunch of text in the process) and then shut down
  14. Restart your Nook Color
  15. That’s it – now your Nook Color is a full-fledged Android tablet!

Sunday, July 24, 2011

Firefox Workaround to Get Rid of the New Facebook Sidebar

Facebook Logo

Did you agree to try the new Facebook Sidebar and now wish you hadn’t?

Let’s face it, the new Facebook Sidebar is pretty pointless! It only shows you some of your contacts (the ones you chat with the most) instead of showing all of the ones who are online or idle. The worst part is, there is no “official” way to go back to the old one.

Of course, you could try some JavaScript hacks, which turn up when you do a Google search for “get rid of new Facebook Sidebar” or something similar.

But there is an easier way, if you are using Firefox! The following information, which is taken from http://downloadsquad.switched.com/2008/04/24/add-facebook-chat-to-your-firefox-sidebar/, will help you:

All you have to do is click on your bookmark toolbar and create a new bookmark. Give it whatever name you like, and enter this for the URL:

http://www.facebook.com/presence/popout.php

Make sure to select the button that says "Load this bookmark in the sidebar" and you should be all set.

Note that you can drag the sidebar divider to make the Facebook Chat window larger or smaller. If all you want to do is see your contact list, the sidebar doesn't take up much space as all. But if you want to actually open a chat window with one or more of your contacts, you'll need to widen the sidebar a bit, which will cost you some valuable web browser real estate.

The added benefit with the method above is that Facebook Chat stays in the Firefox Sidebar even when you browse to other websites!

Pretty nifty, eh?

Monday, July 18, 2011

My first screencast–A quick look at WebEx

I tried my hands at screencasting for the first time a couple of days back and posted my output on YouTube. Check it out, and tell me what you think:

If you are interested in doing your own screencasts, just download and install CamStudio, a free and open source screen recording software. The output that CamStudio gives you is very high quality (i.e. the file size is very big), so I used another product called Handbrake to reduce the audio and video quality a bit. I then uploaded the output I got from Handbrake onto YouTube (you have to sign-up for a free YouTube account first).